 Pin it
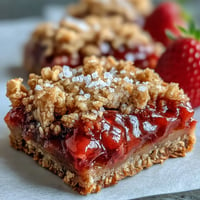
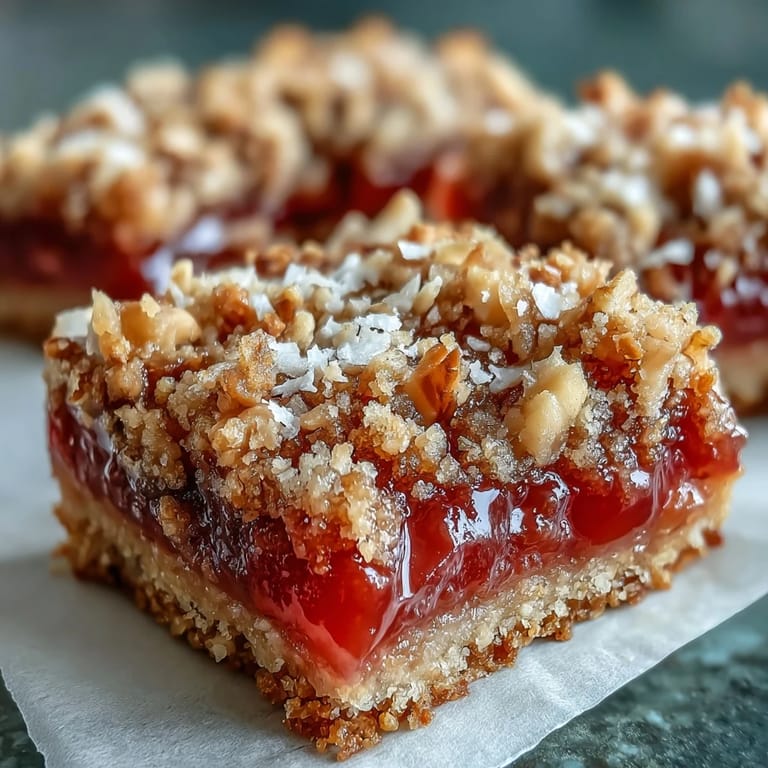
 My neighbor brought over a jar of homemade guava jam one afternoon, insisting I do something special with it instead of just spreading it on toast. That evening, I started layering ideas in my head—what if the jam became the soul of a bar cookie, something with texture and warmth? These guava jam bars were born from that conversation, a fusion dessert that tastes like a tropical escape wrapped in buttery, nutty crumble.
I made these for the first time at my sister's beach house, where the kitchen was tiny and the afternoon was impossibly hot. As the bars baked, the guava bubbled and caramelized, filling that little kitchen with this honeyed, almost floral sweetness that made everyone gravitate toward the oven. By the time they cooled enough to cut, we were already making plans to bake them again.
Ingredients
- All-purpose flour: The foundation that keeps your crust tender and holds everything together without being tough, which is why you'll want to measure it by weight if you can.
- Old-fashioned rolled oats: These create the signature chew and structure—steel-cut oats will feel too dense, so stick with the ones you recognize.
- Granulated sugar and brown sugar: Together they create depth and help the topping brown beautifully, with the brown sugar adding a subtle molasses flavor.
- Salt and cinnamon: These quiet spices amplify the tropical warmth without announcing themselves, letting the guava stay the star.
- Unsalted butter, melted: Melting it first ensures even distribution and creates that golden, moist crumble texture.
- Unsweetened shredded coconut: The unsweetened kind lets you taste the actual coconut rather than sugar, making it feel more sophisticated and less candy-like.
- Roasted macadamia nuts: Their buttery richness complements guava in a way that other nuts can't quite match, and roasting them first amplifies their flavor.
- Guava jam or paste: The quality matters here—taste yours before committing; some brands are overly sweet while others have a deeper, almost savory edge.
- Fresh lime juice: This brightens the guava and prevents the bars from tasting one-dimensional or cloying.
Tired of Takeout? 🥡
Get 10 meals you can make faster than delivery arrives. Seriously.
One email. No spam. Unsubscribe anytime.
Instructions
- Set yourself up for success:
- Preheat your oven to 350°F and line your pan with parchment, making sure it overhangs so you can lift the whole slab out later. This step matters more than you'd think—it saves frustration and keeps your bars intact.
- Build your crumble base:
- Combine flour, oats, both sugars, salt, and cinnamon in a large bowl, then pour in the melted butter and stir until the mixture looks like wet sand. Fold in the coconut and macadamia nuts gently so they're distributed evenly without crushing them.
- Press and reserve:
- Measure out 1 cup of crumble to set aside for topping, then press the rest firmly into your prepared pan using the bottom of a measuring cup or your fingertips. You want a compact, even layer that will hold the jam without crumbling apart.
- Prepare the filling:
- Stir guava jam with fresh lime juice in a small bowl until it's smooth and spreadable—this shouldn't take more than a minute, and the lime juice will taste subtle but essential once baked. Spread it evenly over your crust in one confident motion.
- Crown with crumble:
- Sprinkle your reserved crumble mixture over the jam layer and resist the urge to press down—let it stay loose and chunky so it toasts into golden, crispy peaks.
- Bake until golden:
- Slide into the oven for 30 to 35 minutes, watching until the topping turns golden brown and you see jam bubbling slightly at the edges. Your kitchen will smell like a tropical daydream at this point.
- Cool and cut:
- Let the entire pan cool to room temperature before attempting to cut—patience here prevents crumbles from falling apart. Use a sharp knife and wipe it clean between cuts for neat edges.
 Pin it
 These bars became the thing my friends requested whenever someone was celebrating something, which is when you know a recipe has really stuck. There's something about the combination of textures and that unexpected tropical flavor that makes people feel like you put real thought and care into feeding them.
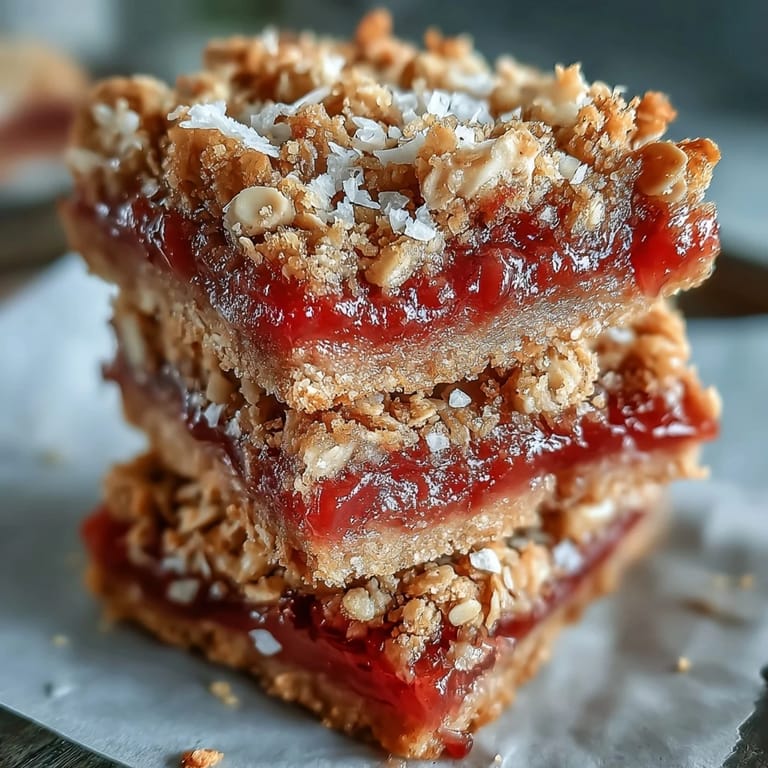
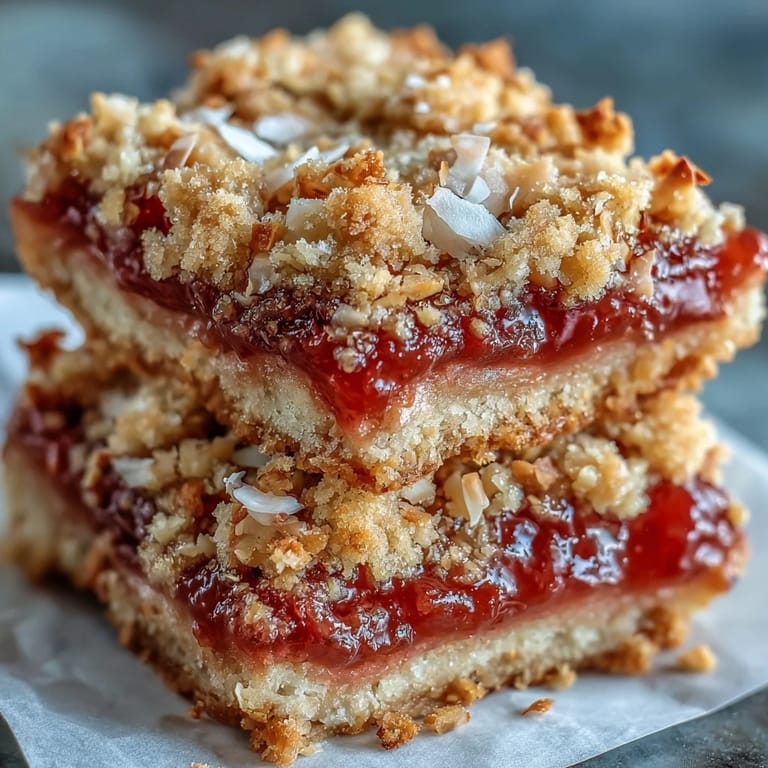
Understanding the Layer Logic
The beauty of this bar is how it works structurally—the crust provides stability and keeps the jam from soaking straight through, the jam is your burst of flavor and sweetness, and the crumble on top toasts into these little golden clusters that contrast beautifully with the chewy middle. I used to wonder why the crumble had to be reserved separately instead of just mixed all at once, but the answer is texture. Your crust needs to be compact to hold the jam, while your topping needs to stay loose and chunky so it crisps up properly. Once you understand that, you can tweak the recipe with confidence.
Playing with Variations and Flavors
While guava is my preference, these bars are forgiving enough to work with apricot, raspberry, or even a passion fruit curd if you're feeling adventurous. The coconut-macadamia combo is what truly defines them, so I'd keep that constant, but you could experiment with brown sugar versus muscovado, or swap half the macadamias for roasted cashews if that's what's in your pantry. I once tried adding a touch of vanilla extract to the crumble mixture and found it made the whole thing feel more developed without overwhelming the tropical flavor.
Storage and Serving Wisdom
These bars keep beautifully in an airtight container for up to four days, and they're actually better on day two when the flavors have settled together. If you want to get fancy, serve them slightly warm with a scoop of vanilla ice cream—the warmth softens the jam again and the cold cream becomes this creamy counterpoint.
- Store in an airtight container at room temperature and avoid stacking them directly on top of each other if possible, since the topping can shed.
- You can bake these a day ahead, which is perfect for dinner parties or when you want to feel like you have your life together.
- If your guava jam is particularly stiff straight from the jar, warming it gently in the microwave for 20 seconds makes it spread like silk.
 Pin it
 These guava jam bars remind me that the best recipes come from moments of connection—from neighbors sharing gifts and conversations happening naturally in the kitchen. They're proof that you don't need to be a professional baker to create something memorable.
Recipe FAQs
- → Can I use other fruit jams besides guava?
Apricot or raspberry jam work beautifully as substitutes. Choose jams with similar thickness to maintain the proper layer consistency and fruit-to-crust ratio.
- → Should I toast the coconut and macadamias first?
Lightly toasting the coconut and macadamia nuts before adding them to the crumble enhances their natural flavors and adds deeper nutty notes to the finished bars.
- → How do I know when the bars are done baking?
The bars are ready when the crumble topping is golden brown and you see the jam bubbling at the edges of the pan. This usually takes 30-35 minutes at 350°F.
- → Why must I cool the bars completely before cutting?
Allowing the bars to cool completely sets the jam layer and firms up the crumble, ensuring clean cuts and preventing the filling from oozing out when sliced.
- → Can I make these bars gluten-free?
Substitute the all-purpose flour with a 1:1 gluten-free flour blend. Ensure your oats are certified gluten-free, as cross-contamination can occur during processing.
- → How should I store these bars?
Store in an airtight container at room temperature for up to 3 days, or refrigerate for up to a week. The bars also freeze well for up to 3 months when wrapped tightly.