 Pin it
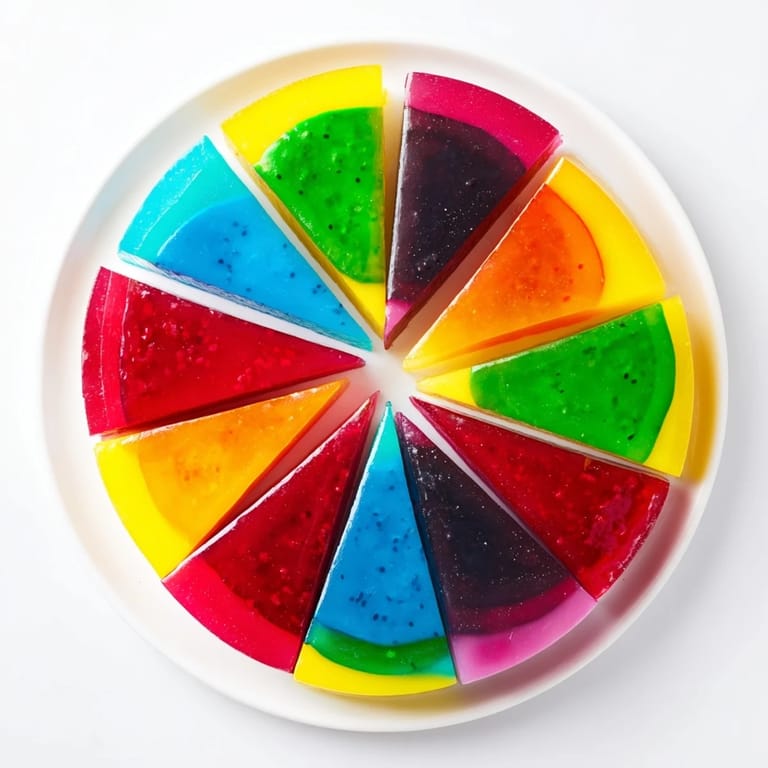
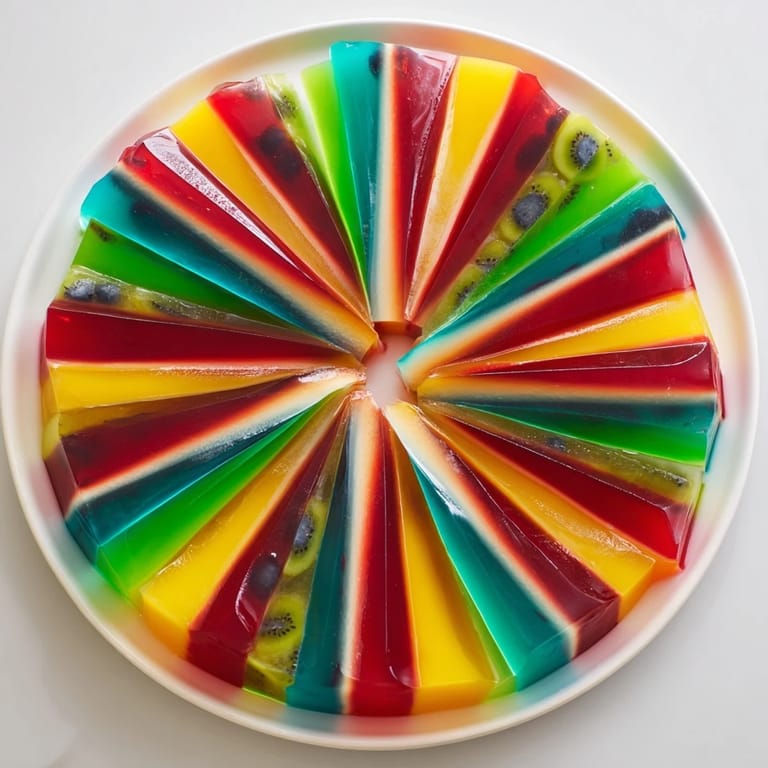
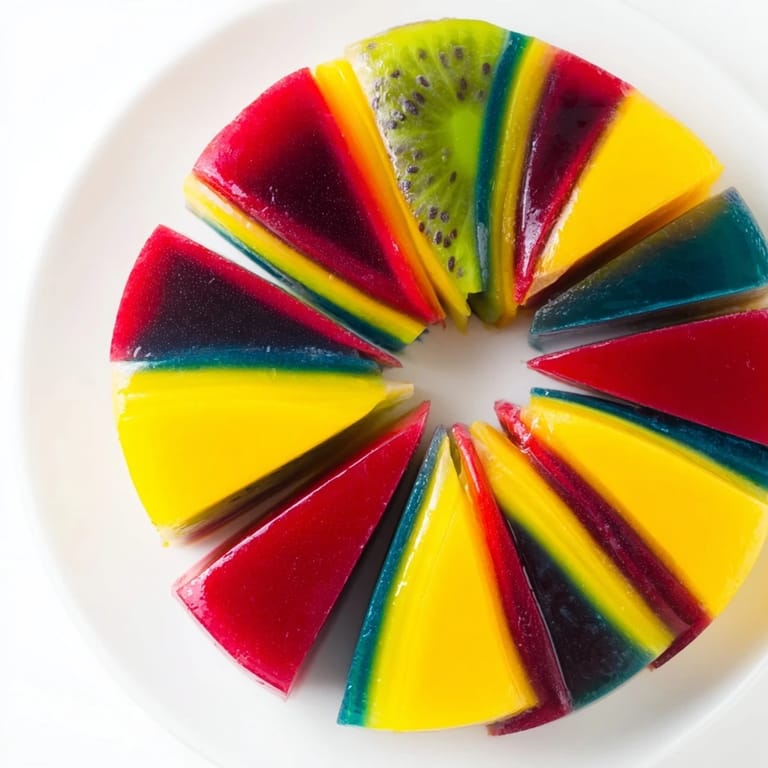
 The first time I set out to make something truly memorable for a dinner party, I was intimidated by anything that looked fancy. Then I discovered the magic of gelatin and fruit purees, and suddenly I realized that stunning presentations don't require culinary school—just a little patience and a willingness to play with color. The Kaleidoscope changed how I think about desserts; it taught me that people eat with their eyes first, and when you crack into those V-shaped segments to reveal a hidden spectrum of flavors, you've already won them over.
I remember making this for my sister's birthday potluck, honestly expecting it to be a disaster since gelatin desserts intimidated me. When I unmolded it and saw those perfect V-shaped segments of red, yellow, green, blue, and purple catching the kitchen light, I called everyone in to look before we even plated it. One person actually took it as a centerpiece to the table instead of letting me serve it right away—it sat there for ten minutes while people photographed it and marveled at it, and that's when I knew this recipe was special.
Ingredients
- Whole milk and heavy cream: These form the creamy base that lets the colors and flavors shine without being too heavy, and the balance between them gives you that luxurious texture without overwhelming richness.
- Granulated sugar: Just enough to add sweetness without making the custard cloying, and it helps the gelatin set properly.
- Powdered gelatin or gelatin sheets: The backbone of this whole dessert; powdered is easier to measure and bloom, but sheets give you a bit more control if you're fussy about texture.
- Vanilla extract: A whisper of vanilla keeps everything cohesive and prevents the fruit flavors from feeling too sharp or artificial.
- Food coloring (gel or liquid): Gel coloring gives you more vibrant hues without thinning the mixture like liquid coloring does, so if you have it, use it.
- Fruit purees: Raspberry, mango, kiwi, blueberry, and blackberry give you a ready-made color palette, but this is where you can get creative and swap in passion fruit or strawberry if you prefer.
- Digestive biscuits or graham crackers: These form a buttery, crumbly base that holds everything together and adds a slight textural contrast to the silky custard layers.
- Unsalted butter: Melted and mixed with the crumbs, it creates that perfect binding that doesn't taste greasy or overly sweet.
Tired of Takeout? 🥡
Get 10 meals you can make faster than delivery arrives. Seriously.
One email. No spam. Unsubscribe anytime.
Instructions
- Crush and press the base:
- Pulse your biscuits until they're fine crumbs (not powdery, just crumbly), then mix with melted butter and press firmly into your parchment-lined pan. The pressure matters here—you want a compact, sturdy base that won't crumble when you pour the warm custard on top.
- Bloom the gelatin:
- Sprinkle gelatin over cold water and let it sit untouched for five minutes so it softens and absorbs the water. This step prevents clumping when you add it to the hot custard, and it's one of those small details that separates a silky result from a grainy one.
- Heat and combine the custard:
- Warm your milk, cream, and sugar together until the sugar dissolves completely and the mixture steams gently but doesn't bubble. Remove from heat, stir in your bloomed gelatin until it vanishes completely, then add vanilla and let it cool just slightly—this prevents the gelatin from breaking down.
- Divide and color:
- Split the custard into five bowls, add your fruit puree and coloring to each, and stir until the color is even and the flavor is balanced. This is where you get to see your palette come to life, and you'll notice how the fruit purees deepen the colors naturally.
- Create the V-shaped sections:
- Arrange your aluminum foil dividers (or cardboard) into five V-shaped wedges inside the springform pan, making sure they're tall enough to reach the top and secure enough not to wobble. Pour each colored custard into its assigned section carefully and chill for thirty minutes until set enough that the dividers won't shift the layers when you remove them.
- Release and chill:
- Gently remove the dividers by tilting and wiggling them free, then run a thin knife around the edge of the springform pan and release the sides. Chill for at least two more hours so the layers bond slightly and the whole thing holds its shape when you slice it.
 Pin it
 There's a moment right after you release the springform pan and you run that knife around the edge, hearing the subtle crack of the set custard separating from the metal, that feels genuinely ceremonial. My hands were shaking the first time I did this, worried I'd somehow ruined hours of work in the final seconds, but then I made that first slice and the kaleidoscope appeared—five perfect V-shaped segments radiating out from the center like a stained-glass window. That's when dessert stopped being just dessert and became theater.
The Magic of Color and Flavor Balance
Color and flavor need to work in tandem here, and I learned this the hard way when I tried to use food coloring that didn't match the fruit I'd chosen. A bright pink custard with blackberry puree looked muddy, and people couldn't quite taste what they thought they were seeing. Once I aligned the colors with the actual fruit flavors—the way nature intended—everything clicked into place. The eye and the palate were having the same conversation, and that's when the dessert felt truly special and intentional rather than just pretty.
Serving and Presentation Tips
When you slice into this, use a sharp knife dipped in hot water and wiped clean between cuts—it sounds fussy, but those clean edges are what make the kaleidoscope effect sing. I've found that letting people watch you slice the first piece is part of the experience; the anticipation and then the reveal is half the joy. Serve it slightly chilled but not ice-cold, because warmth brings out the fruit flavors and makes the custard feel more luxurious on your tongue.
Customizing Your Palette
This dessert is genuinely forgiving in terms of customization, and some of my best versions came from working with whatever fruit purees I had on hand or could get at the farmers market. I've made versions with passion fruit, strawberry, and even a cotton candy puree that made people laugh the moment they saw it. The structure stays the same; you're just painting with different colors and flavors, which means you can make this a dozen times and it will never feel repetitive.
- Mix and match any fruit purees you can find, and don't worry if they shift the classic palette slightly.
- For a vegan version, swap agar-agar for gelatin and use coconut milk plus coconut cream for a richer texture.
- Serve with fresh whipped cream or a quenelle of crème fraîche to add another layer of creaminess and sophistication.
 Pin it
 This dessert reminds me that some of the most impressive things we create in the kitchen come from understanding one simple technique and then playing with it fearlessly. Every time I make this, I'm still amazed that something so visually stunning is genuinely accessible to anyone willing to spend forty minutes and a little patience.
Recipe FAQs
- → How is the vibrant color achieved in this dessert?
Natural fruit purées combined with food-grade coloring are added to each layer, creating bright, contrasting hues arranged in V-shaped segments.
- → What base is recommended for the dessert?
A crumbly base made from crushed digestive biscuits or graham crackers mixed with melted butter provides a firm foundation and texture contrast.
- → Can this dessert be made vegan-friendly?
Yes, by substituting gelatin with agar-agar and using coconut milk and cream alternatives, the dessert suits a vegan diet.
- → How long should the layers chill before removing dividers?
Each colored layer should chill for about 30 minutes until firm enough to carefully remove the dividers without disturbing the shapes.
- → What tools are necessary for preparing the segmented layers?
Key tools include a springform pan, aluminum foil or cardboard dividers to create V-shaped sections, and mixing bowls for preparing each colored layer.